| U-HUTSID0-66T at MP 62.4 on the Forsyth Sub. Photo by James Ogden. |
Showing posts with label Dash 9-44CW. Show all posts
Friday, November 30, 2012
Photo of the Week: First Snow
A couple of weeks ago, Eastern Montana received their first snowfall. It amounted to just a couple of inches, but it was just enough to blanket the entire area in some white powder and brighten everything up from the fall brown. Several days later I found myself out working in that fresh snow, and had the opportunity to capture my train, the U-HUTSID0-66T, near Shirley, MT. We were following an eastbound coal train, which had stopped at the west end of Shirley, to wait for a westbound train to clear the main into the siding there. We had a red signal at MP 62.4, which is where the eastbound approach signal for Shirley is located. While we could have proceeded at restricted speed, I decided to just sit tight and wait for an Approach signal, since I knew the train ahead would be moving soon anyway. Since we had a few minutes to kill, I decided to take advantage of the morning sun and fresh snow, and get this picture. Also, I had been sitting for a while and this gave me a good reason to get up and go for a short walk along the river, and get the "I've been sitting too long jitters" out of my system.
(I have to admit, I am pretty happy how this turned out. I do not consider myself a photographer, and this was just a quick shot. :) )
Labels:
BNSF Railway,
Dash 9-44CW,
ES44AC,
General Electric,
Photo of the Week
Friday, June 8, 2012
Photo of the Week: Work Train
If you follow our Facebook page, you may have seen this one already, but I thought it would share it on here too. Actually, it came out better than I had expected.
For the last few weeks, I have been on a regular assignment, working on a ballast train to support undercutters working in the area. Every day we go out with ten to fifteen cars loaded with ballast, and dump it in the areas they cut with the undercutter. Some days it seems like they only cut a few feet, other days they cut over a mile. It just depends on what needs to be done, and how long they can go before the machine breaks down!
A few days ago we had pulled our train out of the siding in Marsh, MT, and headed west, following the undercutter and a surfacing crew. They were cutting just east of Terry, MT, and we had several hours to kill before they had made enough progress cutting for us to come in and start dumping ballast. While we were waiting, I decided to step off the engine and take a few pictures. I was riding the rear because I have been working as a brakeman. We like to have someone on the rear of the train so that if we have to back up, there is someone who can protect the shoving movement. This is one of the photos I took on my little walk.
We had about 15 cars, with one engine on the west end and two on the east end. Normally we operate with an engine on each end and have them linked as distributed power. Earlier in the week, we had had problems getting the units to link up properly, so a third one was sent out. That one would not link either, and so mechanical decided it was not worth sending a fourth locomotive out to a 15 car train! They told us to just release the brakes, cut out the valves, and just pull the engines like they were any other rail car. When we had to change directions, we just switched which engine got towed.
For the last few weeks, I have been on a regular assignment, working on a ballast train to support undercutters working in the area. Every day we go out with ten to fifteen cars loaded with ballast, and dump it in the areas they cut with the undercutter. Some days it seems like they only cut a few feet, other days they cut over a mile. It just depends on what needs to be done, and how long they can go before the machine breaks down!
A few days ago we had pulled our train out of the siding in Marsh, MT, and headed west, following the undercutter and a surfacing crew. They were cutting just east of Terry, MT, and we had several hours to kill before they had made enough progress cutting for us to come in and start dumping ballast. While we were waiting, I decided to step off the engine and take a few pictures. I was riding the rear because I have been working as a brakeman. We like to have someone on the rear of the train so that if we have to back up, there is someone who can protect the shoving movement. This is one of the photos I took on my little walk.
We had about 15 cars, with one engine on the west end and two on the east end. Normally we operate with an engine on each end and have them linked as distributed power. Earlier in the week, we had had problems getting the units to link up properly, so a third one was sent out. That one would not link either, and so mechanical decided it was not worth sending a fourth locomotive out to a 15 car train! They told us to just release the brakes, cut out the valves, and just pull the engines like they were any other rail car. When we had to change directions, we just switched which engine got towed.
Monday, June 4, 2012
Patches and Decals
Recently I discovered, or perhaps should say, rediscovered Microscale Decals. This led to a few unanticipated small projects. I had a little time to kill and was browsing their railroad products, mostly to see if they had anything interesting. A lot of times when I browse sites like that, just to kill some time, I find a lot of interesting things and add them to the shopping cart. Later when I finally look at the cart, I find I really do not have any use for most of the stuff in there, and need even less of it! But it is fun to cyber window shop sometimes.
As I was browsing the selection of decals on the Microscale website, I actually found quite a few things I could use. For some time I have had engines on my roster that still have either BN or ATSF reporting marks. Since I model more or less current BNSF operations, I have been wanting to patch these units for a while. I also have had a few BNSF engines with the wrong number on them, which needed to be patched and renumbered. I discovered that Microscale made decals for just those purposes. They have decal sheets with colored patches, which are designed to closely match BN green, ATSF yellow, and BNSF orange. A close match is all that is needed since most patches do not exactly match the rest of the locomotive. They also have a sheet with various size and color BNSF stencils, which can be used over the colored patches. I bought a sheet of each.
Besides BNSF decals, Microscale has quite a large selection of other decals. I also found some Amtrak decals for Phase 3 locomotives. It was described as Phase 3 and heritage units, although I bought it too quickly, not realizing that it meant Phase 3 heritage units. As it turns out there is one for Phase 4 heritage units, too. I did find some useful decals on the Phase 3 sheet anyway, although a few days later I also went and bought the Phase 4 one. I have had a few old Athearn blue box units in Amtrak's Phase 4 scheme, one of which as unnumbered. With just decals, I figured I could make a close representation of the Phase 4 heritage unit, which as far as I can tell, was never commercially produced.
Once all the decals arrived, I went to town working on my engines. I had a pair of BNSF SD60M's, which were once numbered in the 9200 series. When BNSF bought the SD70ACe's, they decided to number some of those in the 9200 series, and consequently the SD60M's were all renumbered into the 8100 series. I patched out the numbers on the models and put the proper 8100 numbers on them.
Some other units required patching it all the Burlington Northern lettering, and replacing it with a BNSF stencil. Fortunately, with the green patches provided, that proved to be a fairly straightforward task too. On a couple of the Geeps, I decided to add stencil that says, "Remote Control Equipped" as well. Typically older Geeps can be found working yards, and many of them have been equipped to operate as a remote control locomotives, especially at larger yards.
The ATSF units had were the easiest to patch. Many of them have kept their original paint scheme and some even still say, "Santa Fe" across the long hood. On those, usually a yellow BNSF stencil is found below the number on each side of the cab. A few of those were included on one of the decal sheets and I used them on my two Santa Fe units, that wear the red and grey "Warbonnet" paint scheme. Now all my BNSF "heritage" units have been updated to the current standard.
On the Amtrak decal sheets, I found everything I would need to make a phase 4 heritage unit, even including the stripes. My unit had the stripes and everything, it just had no number. While the heritage scheme is not exactly the same as the phase 4 scheme was, it is very similar. I have thought about painting the unit to make it an exact match, and I probably will in the future, but for now I am going to settle for jut the decal work. I had a few things to add to that, such as the GE builders stickers and the American flags, but other than that, it was a simple matter of adding a number, 184 in this case, and putting the 1971 and 2011 stencils on either side of the locomotive body.
Since I finished most of those projects, I have discovered that Microscale also carries all the small warning and data decals for GE locomotives. They probably have something similar for EMD units, although I did not look. I have a Dash 9-44CW that has no warning labels on it at all, and so it is getting dressed up now. It is interesting how the locomotive never really looked incomplete to me, but now that it is getting a lot of those decals, it looks considerably more complete. It is one of those things that I never noticed, but once I did, I could not help noticing it again every time I looked at the engine. Decals are easy to add to an engine, or any other rolling equipment, and they can add a lot to the overall appearance of a model. Most of these projects can be finished in an hour or two, even at a leisurely pace.
| Former BNSF 9290, patched to become 8190. |
| Former BNSF 9223, now renumbered, still needs new number boards. |
| Former ATSF 650 has received a BNSF stencil below the number. |
| BN 2522 has been stenciled for BNSF. |
| BNSF 2522 is a remote controlled unit. |
| Amtrak #1 got a flag and a sign on the door. |
Labels:
BNSF Railway,
Dash 9-44CW,
Decals,
General Electric,
Modeling,
Santa Fe (ATSF),
SD60M,
SD70ACe
Friday, March 18, 2011
Prototype Railroading: GE vs. EMD
Yes, you are getting two posts from me this week. Why? Well, I have two days off this week. Trust me, this is going to be more of an exception than the rule. But enjoy it while it lasts!
First of all, before I get into everything I want to talk about, I want to open this particular series up to all of you. If you would like to see me to talk about something in particular when I write this series of stories and experiences, please feel free to email me, and I will do my best to put something together. If you have questions, again, please send me an email at ogden.bros.trains@gmail.com, and I would be happy to help. I would love to hear from you!
Today I want to talk about variations in locomotives. Now, I like to consider myself to be fairly observant, but sometimes I do not notice the little details. Well, at least not until they matter. As far as relatively modern diesel locomotives go, I would have told you as a railfan that I like those built by EMD better. The reason why was simple--looks. I simply think they are better looking diesels. I would not say I hated the locomotives built by General Electric, but I did think they were less attractive. As a railfan, where my only concerns were realistic modeling preferences and good photographs, that is all that mattered really. If it looked good in photographs I took, and it looked good on my model railroad, I was a happy foamer! Working for the railroad has made different things important, at least in daily operations.
For the last five days, I have been working a utility position in the yard at Glendive. The utility crew is responsible for putting locomotives on trains before the train crew gets there, so that their train is ready to go when they are. Glendive has a locomotive servicing and fueling facility. Because of this, nearly all the trains that arrive here have their locomotives taken off and brought to the roundhouse for servicing. The servicing can be extensive, making major repairs, or it can be as simple as topping off the fuel tank before continuing the trip. Almost every locomotive has a control cab, so in theory, an engineer could do all this moving by himself by changing which cab he operates form whenever he changes direction. While this is often possible, it is very impractical.
To make moving locomotives around the yard more practical, and faster, a conductor is also on the crew. Since most movements require the engineer to operate in reverse, usually with one or more locomotives between him and the back of the consist, the conductor is his eyes at the point, or leading end of the movement. The conductor can give him instructions over the radio, but most conductors prefer hand signals for their convenience. This means that the conductor must be in a place where he can be seen by the engineer. The best place for that is the bottom step at the leading end of a locomotive. There he is close enough to the side of the engine to be seen by the engineer in most situations, while still in a position to hang on during the ride. In such an operation, the size of that step makes a big difference!
Besides being required to ride equipment, the conductor climbs on and off equipment a lot. During one move, the conductor usually has to climb on and off of locomotives several times to line switches or couple locomotives to cars. This is another reason the size of the steps make a difference. Once a locomotive, or a consist of locomotives, is coupled to the train it belongs on, the air hoses must be coupled for the air brakes, the hand brakes on the locomotives must be set, and each locomotive needs to be electronically isolated from the others, for added safety. All of this requires more climbing on and walking around on locomotives. Doing all of this is where I started to notice some details that I had not noticed before. Lets take a look.
First off, lets look at the steps on a typical locomotive built by EMD. I realize the photo is a model, but this was the best photo I could find of a pair of steps on a locomotive, and I really have not had a chance to take any myself. These steps are steep, as usual on a locomotive, so you would climb up and down them more like a ladder, facing the locomotive as you do so. There are a few things I really do not like about these steps. First of all, as you climb higher on them, they get narrower. This locomotive is not so bad, but some of them, with more steps, give me just enough space to squeeze both feet up against each other on the top step. Fortunately, it is pretty rare that you would need to spend any time standing on the top step. Also notice that the steps cut into the walkway. This means, once you have climbed to the top, you need to hang on while you swing yourself around that corner, back over the steps, to get around to the side. Usually this is more noticeable if you are coming from the end and walking around to the side, because you have to hang on to something and watch out for that hole. Another thing, which you would never notice until you have climbed on and off of several of these, is the positioning of the handrails. It does not look like a problem, but consider that as you climb up the steps, you are moving closer to the center of the locomotive, and the hand rails, which are more or less vertical, really are not. By the time you are on that top step, the hand rail is behind you, even if you are leaning back a bit as you climb up. Again, this is more of a problem on locomotives that have more steps. I am not sure that can be avoided, but it can be annoying at times! I will say, EMD has corrected this on their latest units, the SD70M-2 and the SD70ACe. They have steps which are almost identical to those on GE locomotives.
Now, let's look at the steps on a GE locomotive, and hopefully you see why I like them better. Basically, they are easier and more comfortable to use. First of all, they are all the same width. As you climb up the steps, they do not get smaller on you. The handrails turn toward the center of the locomotive more than on the EMD counterparts, which makes them closer to you as you climb up. As you get to the top, you still run into the problem of having the handrail on the locomotive side get behind you, but not nearly as much. Also, notice that the bottom step sticks out quite noticeably. This gives the conductor a great place to stand while giving hand signals to the engineer. On EMD locomotives, the bottom step is the largest, but it does not stick out nearly as far. I would go as far as to say the bottom step on a GE locomotive is downright spacious! It is really nice when you need to turn around to check on something. You can move around down there without having to worry about falling off! Also, up at the top, there is more space to get around the steps, if you are simply trying to walk past them, from the side of the locomotive to the end. I know the picture really does not show that in this case, but look at the bright side, at least it is a photograph of a real locomotive this time!
Now the steps are not the only issue I want to mention. I will not get into locomotive handling or response or anything like that because I am a conductor. I just do not deal with that kind of stuff. That is all up to the engineer. Maybe when I get to that point I will talk about my thoughts. I want to talk about the cabs though. I am not going to get into wide cabs versus standard cabs, but I do want to talk about visibility. Nearly all the trains we send out over the road have wide cab locomotives, so we are just going to go over those, from a conductor's perspective.
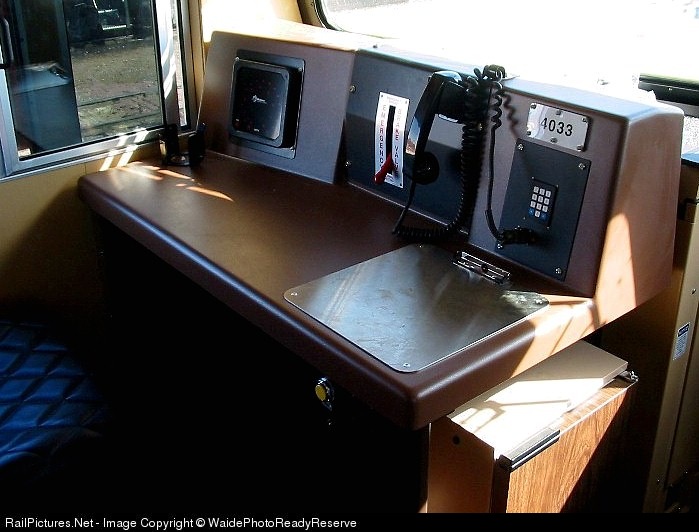
As a conductor or engineer, you want a pretty clear view of what is coming at you. Visibility is very important, but so is comfort, because the cab is a home away from home for many hours each day. The conductor needs certain things on his side of the cab, such as a speedometer, radio, desk for paperwork, an emergency brake, and a horn button. Now, my short experience has shown that generally, the GE locomotive have a little better visibility. This shows the conductor's side of a typical GE widecab locomotive. Specifically, this is a typical model of the Dash 9-44CW. However, even in more recent models, the area has evolved very little. The speedometer is that black square thing on the left. The emergency brake is that red lever in the center. To the right is the radio handset, radio keypad and the locomotive number. Down below the surface of the desk is the yellow horn button. You will notice that the speedometer, emergency brake, and radio keypad are designed to be right in front of the conductor, but they are not high enough to block the view out the front. The conductor can slouch a bit, and even put his feet up, and still have a decent view of what is to come. That is not to say I would ever slouch or put my feet up on the job! :) Also, having the radio down below the desk means that the wire is not in the way or your paperwork when you are trying to talk to the dispatcher and copy a track warrant.
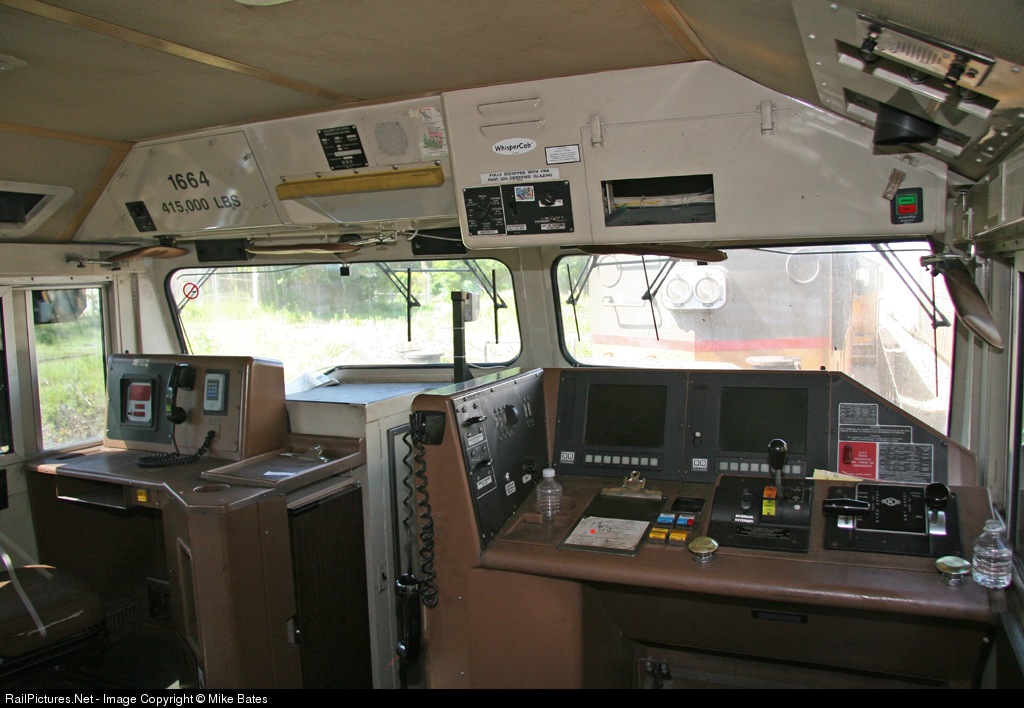
Now, with EMD locomotives, I think their earlier wide cab units had better visibility. Also, it seems to me that the conductor's visibility has gotten progressively worse with every model! An older, SD60M, had great visibility! The only problem with it was they put the emergency brake below the desk and the speedometer up in the ceiling above the desk. There is absolutely nothing to block the conductor's view, but that is not entirely a good thing. To see the speedometer, the conductor either has to stand up and take a step back or lean back really far in the seat and squint a little. While the visibility is great, it is still not the most practical design. With later models, things got better. To the left is a picture of the conductor's side on the SD70MAC, which has its pros and cons. The biggest pro is that the speedometer is in a place where the conductor can realistically see it and read it--right in front of him. One of the biggest cons, the speedometer is mounted on a panel the size of a country in Europe, so the only way you can see over it well is if you are sitting up straight all the time, and who does that?! The radio keypad is also on that surface, moved down form the ceiling, and the radio was moved up from under the desk, which is okay, but the wire can get in the way sometimes. Usually to solve that problem, the wire gets wrapped around one of the sun visors on the ceiling.
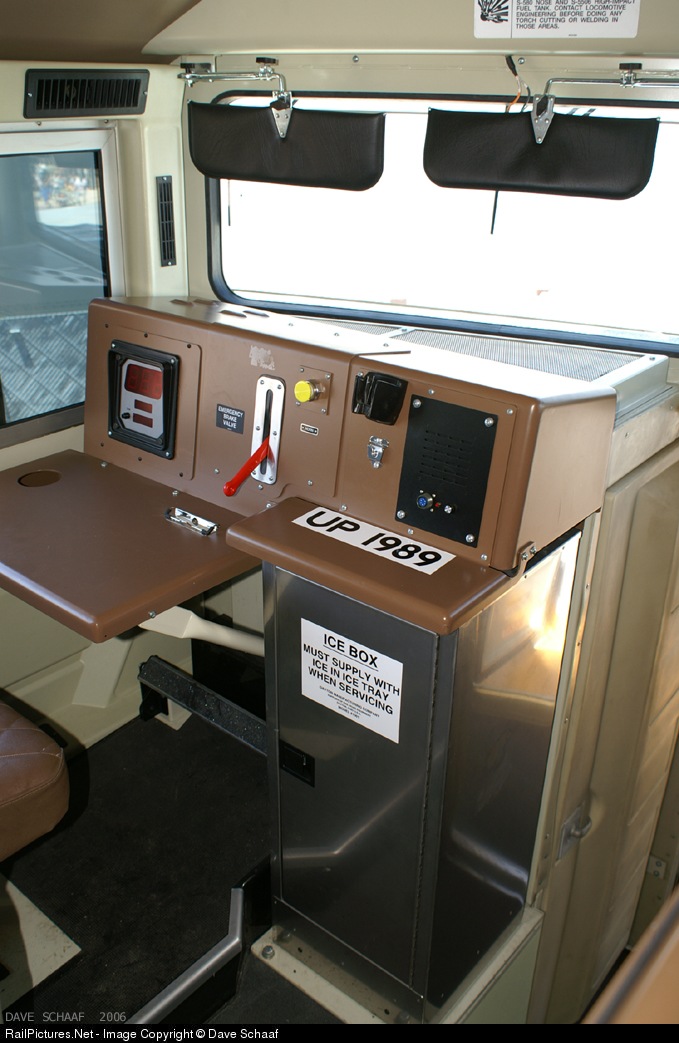
The newest EMD locomotives, the SD70ACe has solved a few problems and created a few more. Take a look. The speedometer panel has not gotten any smaller, but it has gotten lower, which seems to help with visibility. The emergency brake and horn have moved above the desk. The radio is also up top, but off to the right, where the wire does not get in the way of the paperwork. So several problems were solved. However, this is my least favorite cab honestly. The desk area is very small. That has to handle a signal awareness form, which you take notes on regularly, and track warrants, which you also write on regularly. Besides all that, it must also hold the general track bulletins, work orders, and any used track warrants and speed restriction forms you may have received. I usually end up with three or four piles of paperwork, and this desk gives you space for two. The visibility seems to have improved, however this cab has smaller windows, and you sit farther back from them, which means visibility over the desk is better, but not the visibility out to the track ahead. Having said all that, these are some of the quietest locomotive cabs around, unless you left the window open. With the doors and windows all closed up, you hardly feel like you are on a locomotive with a massive diesel engine roaring behind you. Isolating the cab from the noise and vibration was done very well, and that helps to make up for the other problems. The biggest problem with this cab is the fact that the desk does not continue to the right. There is nowhere to put your feet up!
Some locomotives are better than others, and generally speaking, cabs and locomotives have improved in comfort in newer models. However, the person designing locomotives is still sitting behind a desk, not in the locomotives he or she designs. As long as that is the case, there will always be things that bug the people who spend all day on the locomotives. What seems like a good idea on paper is not always a good idea on the road. Using locomotives regularly has started to change my opinion about them. I still think EMD builds prettier locomotives, with the exception of the SD70ACe. But given the choice, I would rather work on a product of General Electric. I like that spacious bottom step for giving hand signals to an engineer three locomotives away. It just makes work easier. I like having a desk in the cab big enough to spread out three or four piles or paperwork and put my feet up while we sit for hours in a siding. So I will take a GE to work with, but an EMD to photograph and play with.
First of all, before I get into everything I want to talk about, I want to open this particular series up to all of you. If you would like to see me to talk about something in particular when I write this series of stories and experiences, please feel free to email me, and I will do my best to put something together. If you have questions, again, please send me an email at ogden.bros.trains@gmail.com, and I would be happy to help. I would love to hear from you!
Today I want to talk about variations in locomotives. Now, I like to consider myself to be fairly observant, but sometimes I do not notice the little details. Well, at least not until they matter. As far as relatively modern diesel locomotives go, I would have told you as a railfan that I like those built by EMD better. The reason why was simple--looks. I simply think they are better looking diesels. I would not say I hated the locomotives built by General Electric, but I did think they were less attractive. As a railfan, where my only concerns were realistic modeling preferences and good photographs, that is all that mattered really. If it looked good in photographs I took, and it looked good on my model railroad, I was a happy foamer! Working for the railroad has made different things important, at least in daily operations.
For the last five days, I have been working a utility position in the yard at Glendive. The utility crew is responsible for putting locomotives on trains before the train crew gets there, so that their train is ready to go when they are. Glendive has a locomotive servicing and fueling facility. Because of this, nearly all the trains that arrive here have their locomotives taken off and brought to the roundhouse for servicing. The servicing can be extensive, making major repairs, or it can be as simple as topping off the fuel tank before continuing the trip. Almost every locomotive has a control cab, so in theory, an engineer could do all this moving by himself by changing which cab he operates form whenever he changes direction. While this is often possible, it is very impractical.
To make moving locomotives around the yard more practical, and faster, a conductor is also on the crew. Since most movements require the engineer to operate in reverse, usually with one or more locomotives between him and the back of the consist, the conductor is his eyes at the point, or leading end of the movement. The conductor can give him instructions over the radio, but most conductors prefer hand signals for their convenience. This means that the conductor must be in a place where he can be seen by the engineer. The best place for that is the bottom step at the leading end of a locomotive. There he is close enough to the side of the engine to be seen by the engineer in most situations, while still in a position to hang on during the ride. In such an operation, the size of that step makes a big difference!
Besides being required to ride equipment, the conductor climbs on and off equipment a lot. During one move, the conductor usually has to climb on and off of locomotives several times to line switches or couple locomotives to cars. This is another reason the size of the steps make a difference. Once a locomotive, or a consist of locomotives, is coupled to the train it belongs on, the air hoses must be coupled for the air brakes, the hand brakes on the locomotives must be set, and each locomotive needs to be electronically isolated from the others, for added safety. All of this requires more climbing on and walking around on locomotives. Doing all of this is where I started to notice some details that I had not noticed before. Lets take a look.
![]() |
| Image from www.bonanza.com |
![]() |
| Image from www.actionroad.net |
Now the steps are not the only issue I want to mention. I will not get into locomotive handling or response or anything like that because I am a conductor. I just do not deal with that kind of stuff. That is all up to the engineer. Maybe when I get to that point I will talk about my thoughts. I want to talk about the cabs though. I am not going to get into wide cabs versus standard cabs, but I do want to talk about visibility. Nearly all the trains we send out over the road have wide cab locomotives, so we are just going to go over those, from a conductor's perspective.
| Image from www.railpictures.net |
| Image by Mike Bates, www.railpictures.net |
| Photo from www.railpictures.net |
Some locomotives are better than others, and generally speaking, cabs and locomotives have improved in comfort in newer models. However, the person designing locomotives is still sitting behind a desk, not in the locomotives he or she designs. As long as that is the case, there will always be things that bug the people who spend all day on the locomotives. What seems like a good idea on paper is not always a good idea on the road. Using locomotives regularly has started to change my opinion about them. I still think EMD builds prettier locomotives, with the exception of the SD70ACe. But given the choice, I would rather work on a product of General Electric. I like that spacious bottom step for giving hand signals to an engineer three locomotives away. It just makes work easier. I like having a desk in the cab big enough to spread out three or four piles or paperwork and put my feet up while we sit for hours in a siding. So I will take a GE to work with, but an EMD to photograph and play with.
Subscribe to:
Posts (Atom)