First of all, I must apologize once again that I am writing so infrequently. This is not due to a shortage of activity, but actually quite the opposite. Between work, volunteering to work on engine #557, and some projects at a local model railroad club, I have been extraordinarily busy!
Progress on the 557 is going nicely. We have acquired some sandblasting equipment and will start cleaning up a lot of the parts. The equipment is not big enough to do the major components of the locomotive, such as the boiler or frame, but it will accommodate many of the more portable parts quite nicely. Additionally, the cab was sent out to a company that donated the labor to sandblast and paint it. We just got it back this week, in green primer. The biggest task remaining is to replace the firebox, which happens to be the next major task actually. Hopefully that will be complete before the weather gets cold. The engine house is not heated.
At the local model railroad club, we had been having some pretty serious and unpredictable electrical problems. The sustainability of the layout was questionable, and normal operations were severely compromised. I suggested we basically rewire the entire thing. It was built about 30 years ago, and designed to run on a direct current power system. Once DCC came into the picture, it was rewired for that, but using some existing wire and some new. Nothing was color coded and very little was labelled. Since it was built, all troubleshooting occurred with no color or labeling and no standardization. All of this made finding and solving the problems difficult and highly impractical. The way the club operates most of the time is when someone suggests a project, they are designated the leader by the rest of the membership. That made me the leader on replacing the electrical system. It was decided that we would only do a portion to start, so that the layout would still be functional, in some form, during the project. Also, any changes or modifications to the track work or scenery would be done simultaneously. This was because almost every layout system ultimately relies on the electrical system. A color code was developed and standards were adopted, and we went to work. As of yesterday afternoon, the section we started with is complete and operating. It has seen a few significant upgrades, including the addition of its own power district, circuit breakers, energized switch frogs, a line change, and the removal of one tunnel and replacement of one bridge. We removed an estimated 3,000 feet of wire and replaced it with less than 300 feet, yet increased reliability and performance. We accomplished all of this in three weeks less than planned.
Work is where I have been spending most of my time, it seems. In July, they started running three person crews on almost every train. This was good because it gave Brakemen, including myself, the opportunity to see some of the railroad outside the yard. I went to Fairbanks three times, Whittier once, and Seward once. Fairbanks is a pretty easy trip, but it is long. The passenger trains run during the day, so to help prevent congestion, and potential delays, the freight trains primarily run at night. There is a freight train that operates northbound and one that operates southbound, between Anchorage and Fairbanks, almost every day of the week. Usually they depart their origin at around 8:30pm, and arrive at their destination 11 to 12 hours later. The trip is 358 miles, and includes both mountain grades and much more gentle river grades. The scenery can be spectacular, when it is light out, which, in the summer, is most of the night.
Whittier was certainly interesting. It is much closer to Anchorage, and freight trains only go there a couple times a week. Whittier is where the Alaska Railroad interchanges with other railroads. There is no direct rail connection between Alaska and the Lower 48 or Canada, so the interchange traffic moves on barges. These barges are huge, about 450 feet long, with eight tracks side by side. There are stantions between the tracks that support containerized cargo above the rail cars. The containers can be stacked four or five high. The barges operate between Whittier and Seattle and between Whittier and Prince Rupert, BC. They carry about 15,000 tons of cargo on the week long voyage. Usually, we operate freight trains to Whittier only when a barge will be in town. When I went to Whittier, we spent the day switching out our train and unloading the barge. We spent that night in a hotel in Whittier, and the next morning, we loaded the barge, built a new train, and brought it back to Anchorage with all the freight we had taken off the barge.
When I went to Seward, we had been assigned to relieve the coal train crew. When we arrived, they were still dumping the coal out of the train. They finished that up, and then we put it together and left town northbound. We brought it back to Anchorage. The coal comes from the Usibelli Mine, in Healy. It gets stockpiled in Seward and periodically loaded onto a ship, which takes it to South Korea. Typically there is a coal ship in Seward about once a month. It takes 24 hours to fully load the ship.
I have also worked a few other trains. To me, the most interesting have been the passenger switching jobs, in the yard. In the evenings, as the passenger trains get in, the yard crew goes out and meets them at the depot. The road crew gets off as soon as they pull in, and the passengers disembark. While still parked behind the depot, the cleaning crew gets on, and the first thing that gets done is a truck comes along and pumps all the toilets. Once that is done, we take the train to the yard. The evening crew is responsible for making up the trains for the next day, so that the morning crew is not delayed and the trains run on time. All the switching happens with the cleaning and food staff still on board, as they get things cleaned and put away for the night. On a typical night, there were three trains to switch and put away. Usually that kept us busy for six to eight hours. Once they were put away, the cleaning crew would wash the exterior. Alaska Railroad takes great pride in its trains, particularly its passenger trains, and they get washed after every trip. Usually they are so clean you can see your reflection in them!
More recently, I have been working the morning passenger switching job. That one basically just moves the trains from the yard to the depot, since the night crew has already put them together. There are a lot of little things to do on that though. The movements are pretty simple, pull out of the yard, wye the train if needed, and park it in front of the depot for the road crew to take over. But we also have to make sure the doors on the platform side are open and the doors on the opposite side are closed. We have to make sure the trap doors, exposing the steps, are in the proper position for high level platform boarding or low level boarding. We also have to make sure the end doors on each car close properly and that the last car has a gate to keep people from stepping out the end door. In the morning, the food service staff are on the train, and the dining cars all smell like breakfast. The cooks get a head start on preparing breakfast, because that will be what the passengers want as soon as they get on the train. Once at the depot, we have to place jump plates between the high level platform and the train, to eliminate the gap between the platform and train. There are barriers on and around the platform that must be positioned to keep people from wandering off where they don't belong, and guide them to the train. Those all have to be repositioned for each train, because each train has a different spot at the depot. So the movements are simple in the morning, but there are a lot of other little things to be done. After all the passenger trains have departed for the day, we usually do a little freight switching and then head home. I like both passenger jobs, which makes me a little different than most. Passenger cars can be frustrating to work with, because they are big and delicate, and the space between cars is filled with wires, hoses, walkways, and other utilities. There are a lot of extra safety rules when switching passenger equipment, especially when it is occupied, but it is something new and different for me.
In the next six weeks, I expect work will be tapering off, as the summer season comes to a close. Most of our passengers will be gone, until May, and our freight will see a bit of a decline as the construction season winds down. Hopefully, this will mean my time to commit to this blog and website will increase, and you will hear from me more! I do have several things in the works, just very little time to work on them!
As always, do not hesitate to email or leave a comment if you have any questions or comments! I promise I will respond!
Showing posts with label Projects. Show all posts
Sunday, August 18, 2013
Monday, March 4, 2013
Walthers City Station Project
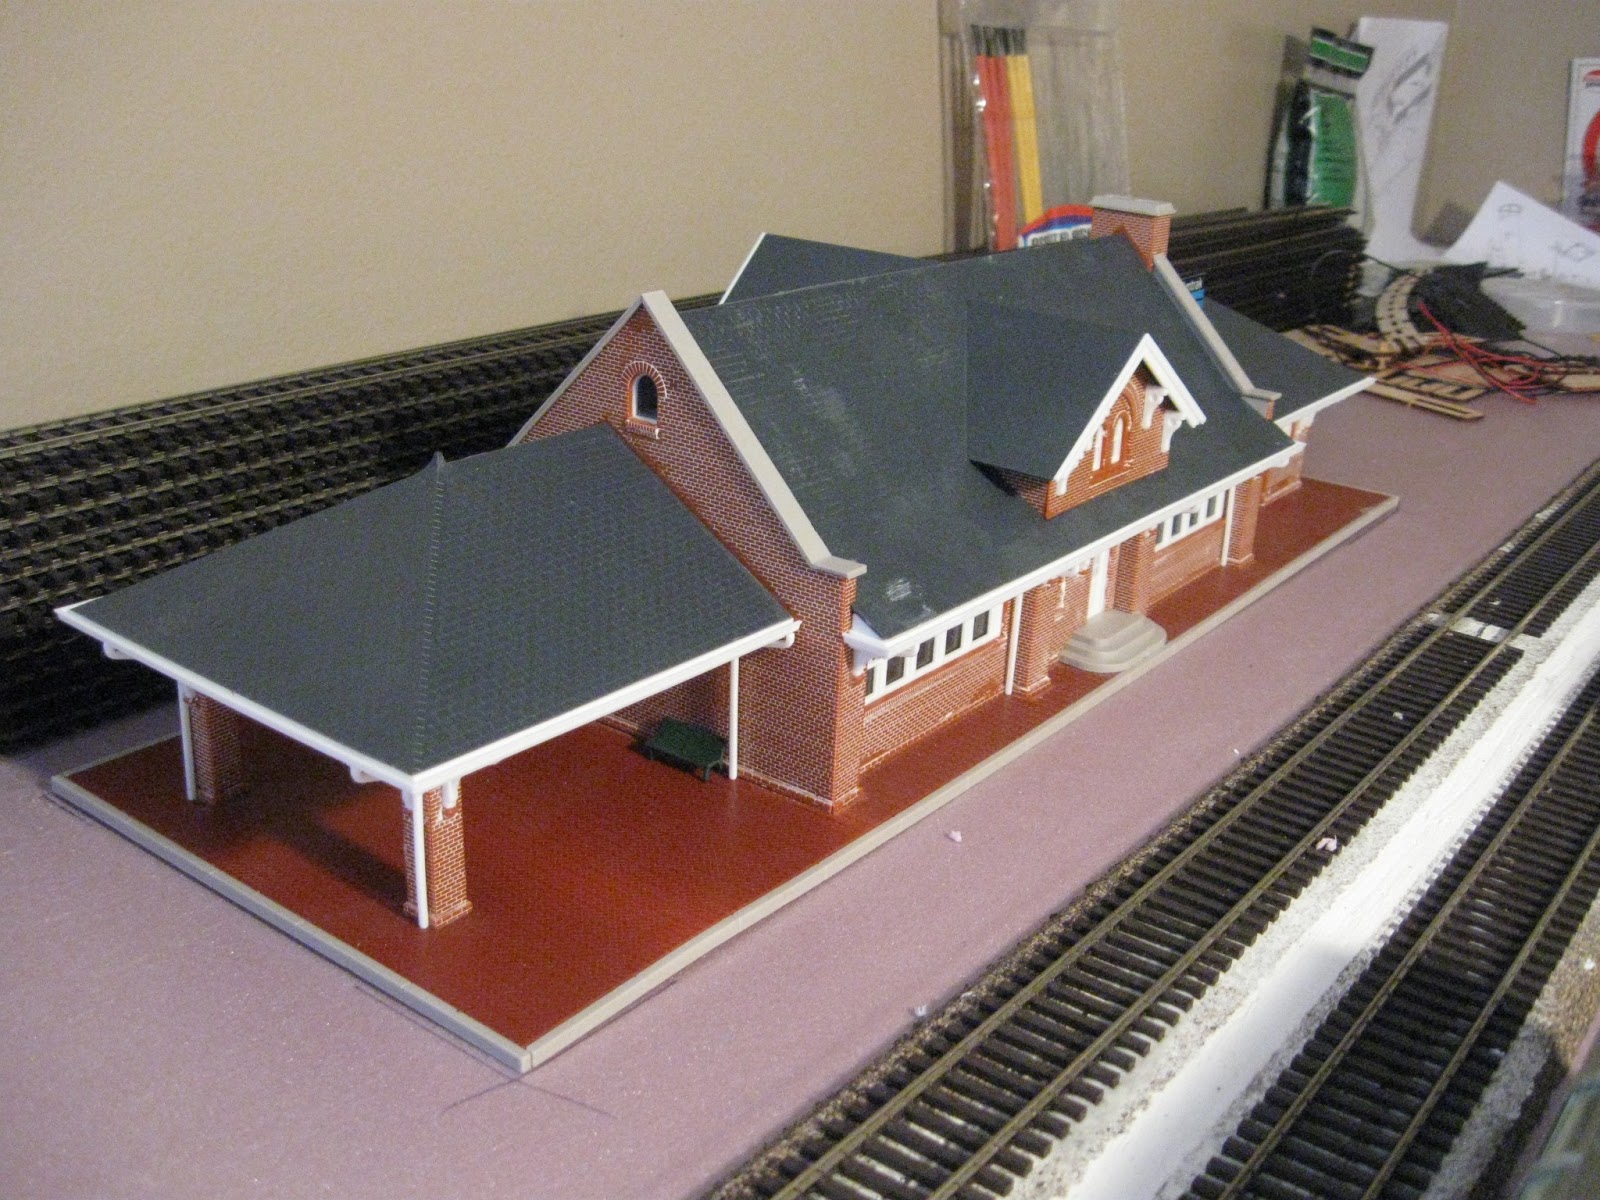
I decided to add lighting when I first started building the model. When I first bought it, it was shipped to New Hampshire, and Steven, in a fit of ambition, decided to start on it. When he moved, he shipped what he had done out to me. At that point, he had added mortar to the brick walls and assembled the main walls. He had also installed most of the windows.
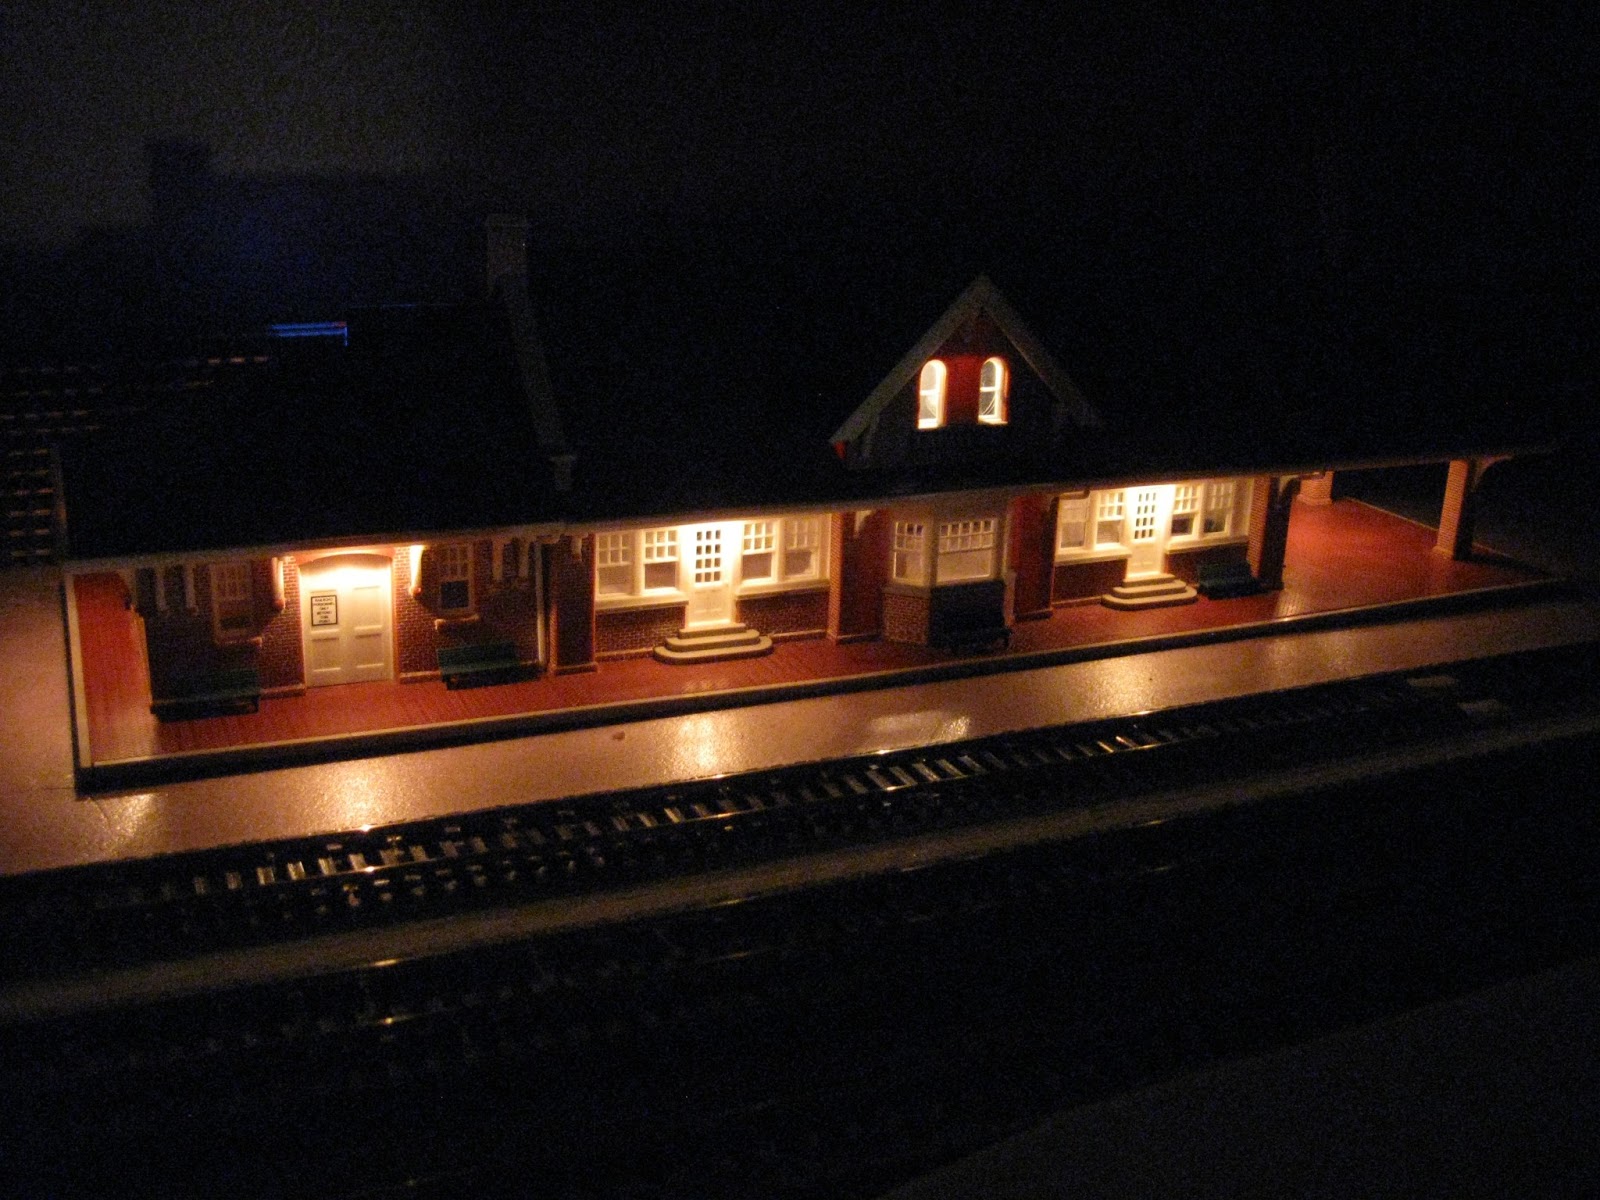
When I got it, I started planning where I wanted lights. This building has fairly small windows, which are difficult to see into, so I decided not to put a detailed interior in it. While I wanted light in the windows, I really wanted a nicely lit exterior, providing lighting for the outdoor waiting areas and the platform. I had quite a few miniature light bulbs on hand from a few other projects, and decided to use those. They operate on 12 volts, so I would not need to put in any resistors or other electronics. I decided there would need to be lights by every door, to light the steps, so people could get in and out safely. Additionally, I wanted lights under the portico, on one end of the depot, so that people waiting under there would have light. A few other lights under the overhang in the roof would balance everything out, and eliminate dark areas around the depot.
Once I decided where to put all the lights, I painted all the interior walls black, to help eliminate any light leaks. I then drilled holes for the bulbs, exactly the size of the bulbs. I then painted the holes black, to help reduce any glow in the plastic, around the light bulbs. I did not want lots of hanging lights, so the light bulbs would be embedded in the plastic to some degree, giving it more of a recessed lighting look. Before installing any light bulbs, I used a scrap piece of plastic from the kit, drilled a hole in it, and placed a light bulb in it and turned it on. I wanted to make sure the light bulbs would not melt the depot! I put the test light bulb on a higher than recommended voltage, and let it sit for several hours. While the plastic was warm, the heat from the light bulb did not seem to be enough to cause it to melt. With that confirmed, I began installing the light bulbs in the depot itself.
As I Installed the light bulbs, I tried to keep the wiring as neat and organized as possible. While it is difficult to actually see in the windows, I did not want wires hanging down in places they would cause shadows or would be easily seen. The interior would be lit, so even wires inside could cause noticeable shadows if they were in the wrong place. After I installed the exterior light bulbs, I put in all the inside ones. I did not want the depot to radiate light, I just wanted there to be enough inside to make it look used. I did not want dark windows on the building.
As I was finishing up installing the light bulbs, I decided I wanted to add a neon Amtrak sign. Miller Engineering (www.microstru.com) makes a fairly significant selection of simulated neon signs, for several model scales, including HO, N, and O. I found an Amtrak sign that was originally designed to be used as a sign hanging from a wall, over a sidewalk. I intended to put it on the roof, although I did not want one as big as their Amtrak billboard. I made a small cut in a wall next to where I wanted the sign, using a hobby knife. I tested the sign several times to make sure it would fit, as I was cutting the hole. The hole was the smallest thickness I could get away with and have the sign fit. I installed the wiring behind the wall, which is high enough up to hide it from view through the windows. Below the table top of the model railroad, I installed a converter module to power the sign, using power from my 12 volt accessory bus wire. I then ran the sign wires and all the light bulb wires to a 4-pin modular plug, like those used in phone lines.
Beneath the layout, I ran some feeder wires from the accessory bus to the hole in the table top. Another set of feeder wires went to the sign module. Under the table, I wired the sign leads and the lighting leads to a 4-pin modular connector, similar to a phone jack. When I placed the depot on the table, all I had to do underneath the table was plug in the modular plug and connector, and turn on the light switch, and the depot lit up. I like using the modular connectors because they allow for quick, easy connections. I can remove the depot easily, for cleaning, and when the time comes to weather my track.
As an afterthought, I decided to add some blinds inside the windows, to help conceal the lack of an interior. I also found some green benches, and placed those around the outside of the depot. Additionally, I found an electric meter, and mounted that on an exterior wall. I still would like to add some support legs to the neon sign, but other than that, I am quite satisfied with the depot. I like how much light it gives off, and once there is a platform in place, it will be a nice centerpiece to the station area.
Thursday, January 24, 2013
Creating a Union Pacific Museum Car
Over the last two evenings, I have been working on a small project with my Union Pacific heritage fleet. Recently, the Union Pacific put a large American Flag wrap on one of their baggage cars, and turned it into a Museum Car, which can frequently be found on their business and excursion trains. I found some photos of the car, Union Pacific 5779, "Promontory," and decided that I wanted something similar in my fleet. Actually, the reason I went looking for the photos was because I had found decals on eBay, for what the seller called the "UP Flag Car," and I was curious to see what they were talking about. RR Picture Archives has several photos of the prototype, both before and after the flag artwork was added. After looking at several of the prototype photos, I decided that I could make such a car, so I bought the decals. I am not sure who makes the decals, as they came in a blank envelope and there was nothing written or printed on the decal sheet, other than the decals themselves.
When the decals arrived, I had one baggage car which I could have used for the decals, however I had already decided that that particular baggage car was destined to become an Alaska Railroad car. So, I began searching eBay for the correct, 85-foot, six axle baggage car, on which I could use the flag decals. Surprisingly, even after several weeks, nothing had surfaced on eBay. A week ago, I was in Billings, and decided to stop at Jim's Junction, the local hobby shop, and take a look around, and much to my surprise, he had exactly the baggage car I was looking for. I bought the only one that was on the shelf. It was a Chicago and Northwestern baggage car, but it had been painted up in the Union Pacific colors for use on their "City" trains. This was a fairly common practice, for UP and CNW to share equipment on those trains. It really did not matter what the lettering was anyway, because it would all have to be removed, regardless of what it said. While I was in the hobby shop, I got talking to another modeler in there, who suggested removing the lettering using a pink eraser. I had heard that before, and decided to give it a try.
When I got the car home, I went out and bought an eraser, making sure I got one that was soft, and had no grains or grit, which might scratch up the paint. I began erasing the "Chicago" on one side of the car, but I was disappointed because after several minutes, there were no noticeable results. There was some black residue on the end of the eraser I had been using, but as far as I could tell, it had done nothing to the lettering on the car. I decided to clean the eraser off and try again. At that point, I started to notice the letters fading, so I kept going. It was a fairly tedious process, to get the "Chicago and Northwestern," "Railway Express Agency," and the little REA star off both sides of the car, but after a while, it was all done. I had the blank yellow car I needed. I did notice that pushing harder on the eraser did not necessarily yield better or faster results. Actually, it tended to start to remove the yellow paint too, so a gentle grip on the eraser, and a bit of patience, seems to be the best way to go. I did notice that the the eraser made the paint a little shinier than in areas where I had not removed the lettering. This was minor and only visible under close inspection in just the right lighting conditions. I did not worry about it too much, because I figured the dullcoat would help to hide it in the end.
Once I was satisfied that I had successfully gotten all the lettering off, and there were no more stray marks from the lettering, I began cutting out the decals. The decals came on one large decal sheet, so whatever I cut out would be the size of the decal I would apply to the car. I carefully cut the decals out very close to the edge of the printed area, so that there would be very little extra clear decal material around the actual flag image. Once the flag was cut out, I used it to determine which grab bars would need to be removed before I could apply the decal. I then removed the roof of the car, removed the windows, and removed the grab bars. I stored the eight grab bars and the windows in a small plastic zip-lock bag, so nothing would get lost or dropped. The next step was to apply the decal.
The flag decal was the largest of the decals I had to apply, which lead me to believe it would be the most difficult. I decided to start with it, because the number and other lettering would be a lot easier in comparison. I started by using a paintbrush to apply some Micro-Sol to the surface of the car. The car has a smooth side, so I knew only a little would be needed, in most areas. Where there were changes in the surface of the car, such as around the baggage doors and around the grab bar holes, I applied the Micro-Sol a bit more liberally. Micro-Sol helps decals to conform to the surface of a model, particularly when the surface is uneven or irregular. It also helps to prevent tears from forming in the decal over uneven and irregular surfaces.
Getting the large decal on and aligned properly was a bit tricky. Actually, it was a full test of patience, honestly! Because the decal is so large, the entire thing must be moved at once when adjustments are needed, to prevent tears or bubbles from forming. Moving and adjusting a decal that is nearly as long as the car is quite tricky, especially over the changes in height where the doors are. I had thought about cutting the decal at the doors, but decided against it, because the cuts would have to be very precise to make the car look right, and then the alignment of the sections would have to be exact. That seemed like more trouble than it was worth! I used a paintbrush and liberal amounts of Micro-Sol around the doors to make sure that the decal formed to the surface of the door openings without bubbling. After what seemed like hours of adjusting the decal, but was probably only several minutes, I was finally satisfied with it and I set it aside to dry. I then went to cut out the other lettering, logo, and number for the car. At this point, the decal had been applied over the window openings, which I knew I would need to cut out later.
Once I was satisfied that the flag decal was dry, I applied the number. On one side of the car, the number decal went on top of the flag decal. The logo and lettering went on the side of the car, beyond the end of the flag. I then cut out two small holes in the flag decal, which I think are vents on the prototype, and the windows. I also reapplied the grab bars. I set the car aside again, so the number and letter decals could dry. I decided to dullcoat that side of the car as soon as the decals were dry, so that I would not damage the decals while working on the other side.
The next evening, I did the opposite side of the car. The other side of the car went nearly the same as the first, except that the flag decal is reversed. Having done it once, I was a bit more confident the second time around, and perhaps slightly more careful. It seemed to go a bit faster though. Once I was satisfied with that side, and the decals had dried, I put some dullcoat on there, to seal the decals in place, and set the car aside again.
This morning, I checked the decals and the dullcoat. I ended up doing a second very light application of the dullcoat because I wanted to hide the edges of the logo decals a little better. Once that was dry, I replaced the windows and reassembled the car. Now I have a museum car to for my Union Pacific Northern steam locomotive (#844) to pull around the layout with my other Union Pacific passenger cars.
Materials:
Walthers "City" Series Baggage 932-9574
Block Eraser
Flag Decal (available on eBay)
Micro-Sol
When the decals arrived, I had one baggage car which I could have used for the decals, however I had already decided that that particular baggage car was destined to become an Alaska Railroad car. So, I began searching eBay for the correct, 85-foot, six axle baggage car, on which I could use the flag decals. Surprisingly, even after several weeks, nothing had surfaced on eBay. A week ago, I was in Billings, and decided to stop at Jim's Junction, the local hobby shop, and take a look around, and much to my surprise, he had exactly the baggage car I was looking for. I bought the only one that was on the shelf. It was a Chicago and Northwestern baggage car, but it had been painted up in the Union Pacific colors for use on their "City" trains. This was a fairly common practice, for UP and CNW to share equipment on those trains. It really did not matter what the lettering was anyway, because it would all have to be removed, regardless of what it said. While I was in the hobby shop, I got talking to another modeler in there, who suggested removing the lettering using a pink eraser. I had heard that before, and decided to give it a try.
When I got the car home, I went out and bought an eraser, making sure I got one that was soft, and had no grains or grit, which might scratch up the paint. I began erasing the "Chicago" on one side of the car, but I was disappointed because after several minutes, there were no noticeable results. There was some black residue on the end of the eraser I had been using, but as far as I could tell, it had done nothing to the lettering on the car. I decided to clean the eraser off and try again. At that point, I started to notice the letters fading, so I kept going. It was a fairly tedious process, to get the "Chicago and Northwestern," "Railway Express Agency," and the little REA star off both sides of the car, but after a while, it was all done. I had the blank yellow car I needed. I did notice that pushing harder on the eraser did not necessarily yield better or faster results. Actually, it tended to start to remove the yellow paint too, so a gentle grip on the eraser, and a bit of patience, seems to be the best way to go. I did notice that the the eraser made the paint a little shinier than in areas where I had not removed the lettering. This was minor and only visible under close inspection in just the right lighting conditions. I did not worry about it too much, because I figured the dullcoat would help to hide it in the end.
Once I was satisfied that I had successfully gotten all the lettering off, and there were no more stray marks from the lettering, I began cutting out the decals. The decals came on one large decal sheet, so whatever I cut out would be the size of the decal I would apply to the car. I carefully cut the decals out very close to the edge of the printed area, so that there would be very little extra clear decal material around the actual flag image. Once the flag was cut out, I used it to determine which grab bars would need to be removed before I could apply the decal. I then removed the roof of the car, removed the windows, and removed the grab bars. I stored the eight grab bars and the windows in a small plastic zip-lock bag, so nothing would get lost or dropped. The next step was to apply the decal.
The flag decal was the largest of the decals I had to apply, which lead me to believe it would be the most difficult. I decided to start with it, because the number and other lettering would be a lot easier in comparison. I started by using a paintbrush to apply some Micro-Sol to the surface of the car. The car has a smooth side, so I knew only a little would be needed, in most areas. Where there were changes in the surface of the car, such as around the baggage doors and around the grab bar holes, I applied the Micro-Sol a bit more liberally. Micro-Sol helps decals to conform to the surface of a model, particularly when the surface is uneven or irregular. It also helps to prevent tears from forming in the decal over uneven and irregular surfaces.
Getting the large decal on and aligned properly was a bit tricky. Actually, it was a full test of patience, honestly! Because the decal is so large, the entire thing must be moved at once when adjustments are needed, to prevent tears or bubbles from forming. Moving and adjusting a decal that is nearly as long as the car is quite tricky, especially over the changes in height where the doors are. I had thought about cutting the decal at the doors, but decided against it, because the cuts would have to be very precise to make the car look right, and then the alignment of the sections would have to be exact. That seemed like more trouble than it was worth! I used a paintbrush and liberal amounts of Micro-Sol around the doors to make sure that the decal formed to the surface of the door openings without bubbling. After what seemed like hours of adjusting the decal, but was probably only several minutes, I was finally satisfied with it and I set it aside to dry. I then went to cut out the other lettering, logo, and number for the car. At this point, the decal had been applied over the window openings, which I knew I would need to cut out later.
Once I was satisfied that the flag decal was dry, I applied the number. On one side of the car, the number decal went on top of the flag decal. The logo and lettering went on the side of the car, beyond the end of the flag. I then cut out two small holes in the flag decal, which I think are vents on the prototype, and the windows. I also reapplied the grab bars. I set the car aside again, so the number and letter decals could dry. I decided to dullcoat that side of the car as soon as the decals were dry, so that I would not damage the decals while working on the other side.
The next evening, I did the opposite side of the car. The other side of the car went nearly the same as the first, except that the flag decal is reversed. Having done it once, I was a bit more confident the second time around, and perhaps slightly more careful. It seemed to go a bit faster though. Once I was satisfied with that side, and the decals had dried, I put some dullcoat on there, to seal the decals in place, and set the car aside again.
This morning, I checked the decals and the dullcoat. I ended up doing a second very light application of the dullcoat because I wanted to hide the edges of the logo decals a little better. Once that was dry, I replaced the windows and reassembled the car. Now I have a museum car to for my Union Pacific Northern steam locomotive (#844) to pull around the layout with my other Union Pacific passenger cars.
Materials:
Walthers "City" Series Baggage 932-9574
Block Eraser
Flag Decal (available on eBay)
Micro-Sol
Labels:
Business Train,
Decals,
Projects,
Union Pacific (UP),
Walthers
Tuesday, May 1, 2012
Alaska Railroad Cars
Some of you may recall that several months ago, I acquired some decals for the Alaska Railroad. Ever since I lived in Alaska, in 2009 and 2010, I have wanted to recreate one of their passenger trains. Commercial models are available for Holland America Tours' private dome rail cars, but not for any of the Alaska Railroad passenger cars. When I first acquired the decals, I was figuring I would just paint up a couple of cars. At this point, the two Budd domes I originally acquired for this project have some company.
I found a couple of ACF dome coaches, from Walthers' Union Pacific City series, a couple of ACF 44-seat coaches, and a baggage car, also from Walthers' Union Pacific City series. The other day I was in a hobby shop and came across some undecorated coach and diner kits, and forgetting that I already had a pair of coaches on order, I bought two of the kits and a diner kit. It seems that I will have a pretty good sized passenger train when all is said and done! Around Christmas time, my wife bought me an airbrush, so I now just need to learn to use that and I can go to town on the painting. Out of the cars I have, five are undecorated, two are decorated, but are gray, and can probably just take another coat of paint, and three must be stripped of their paint before I can do anything with them. Once I get some paint thinner and some more turpenoid, I will be ready to start. In the mean time, I have been doing other prep work for the cars.
In addition to the cars, Steven also sent me a locomotive that I had completely forgotten that I even owned. It was sitting in his train room and I had not seen it in a while. It is an Amtrak E8B. I have no use for it in that paint scheme, as I try to focus on post-2000 in my modeling. My original plan was to sell it, along with about a dozen other items I have in my "list on eBay" pile, but then I discovered an interesting painting and kitbashing project for it. The Alaska Railroad has an E8B they use as a power car. Over the years, it has had its prime movers removed, and generators installed, and is used to generate the Head End Power (HEP), required by the passenger cars. Now, the Alaska Railroad has some Geeps and SD70MAC's that also generate HEP, but sometimes a train needs a little more power, or for some reason a HEP equipped locomotive is not available. Their E8B is P-30, and is an interesting piece of equipment. Originally, E-series engines had six axles under them, but somewhere along the line, P-30 was reduced to only four, making it a pretty unique E8! Most of the roof details were changed when it was turned into a power car, as four smaller generators replaced the original prime movers. Since I only have one, non-HEP SD70MAC in Alaska Railroad colors, I figured I would need P-30 if I wanted my little passengers to have lights and heat!
When all the cars are finished, my Alaska Railroad fleet will look like this:
SD70MAC #4002 Spirit of Seward
E8B Power Car #P-30
Baggage Car #101
Coach #200
Coach #201
Coach #203
Coach #204
Diner #400
Dome Coach #501
Dome Coach #502
Dome Coach #521
Dome Coach #523
McKinley Explorer #1050 Kenai
McKinley Explorer #1051 Knik
McKinley Explorer #1052 Chena
McKinley Explorer #1053 Kobuk
McKinley Explorer #1054 Eklutna
McKinley Explorer #1055 Nenana
McKinley Explorer #1057 Talkeetna
I think it should make a great Denali Star, I just need to find a model railroad with convincing Alaska scenery to run it on! I'll post some pictures on our Facebook page in the morning, although they will be mostly undecorated cars for now.
I found a couple of ACF dome coaches, from Walthers' Union Pacific City series, a couple of ACF 44-seat coaches, and a baggage car, also from Walthers' Union Pacific City series. The other day I was in a hobby shop and came across some undecorated coach and diner kits, and forgetting that I already had a pair of coaches on order, I bought two of the kits and a diner kit. It seems that I will have a pretty good sized passenger train when all is said and done! Around Christmas time, my wife bought me an airbrush, so I now just need to learn to use that and I can go to town on the painting. Out of the cars I have, five are undecorated, two are decorated, but are gray, and can probably just take another coat of paint, and three must be stripped of their paint before I can do anything with them. Once I get some paint thinner and some more turpenoid, I will be ready to start. In the mean time, I have been doing other prep work for the cars.
In addition to the cars, Steven also sent me a locomotive that I had completely forgotten that I even owned. It was sitting in his train room and I had not seen it in a while. It is an Amtrak E8B. I have no use for it in that paint scheme, as I try to focus on post-2000 in my modeling. My original plan was to sell it, along with about a dozen other items I have in my "list on eBay" pile, but then I discovered an interesting painting and kitbashing project for it. The Alaska Railroad has an E8B they use as a power car. Over the years, it has had its prime movers removed, and generators installed, and is used to generate the Head End Power (HEP), required by the passenger cars. Now, the Alaska Railroad has some Geeps and SD70MAC's that also generate HEP, but sometimes a train needs a little more power, or for some reason a HEP equipped locomotive is not available. Their E8B is P-30, and is an interesting piece of equipment. Originally, E-series engines had six axles under them, but somewhere along the line, P-30 was reduced to only four, making it a pretty unique E8! Most of the roof details were changed when it was turned into a power car, as four smaller generators replaced the original prime movers. Since I only have one, non-HEP SD70MAC in Alaska Railroad colors, I figured I would need P-30 if I wanted my little passengers to have lights and heat!
When all the cars are finished, my Alaska Railroad fleet will look like this:
SD70MAC #4002 Spirit of Seward
E8B Power Car #P-30
Baggage Car #101
Coach #200
Coach #201
Coach #203
Coach #204
Diner #400
Dome Coach #501
Dome Coach #502
Dome Coach #521
Dome Coach #523
McKinley Explorer #1050 Kenai
McKinley Explorer #1051 Knik
McKinley Explorer #1052 Chena
McKinley Explorer #1053 Kobuk
McKinley Explorer #1054 Eklutna
McKinley Explorer #1055 Nenana
McKinley Explorer #1057 Talkeetna
I think it should make a great Denali Star, I just need to find a model railroad with convincing Alaska scenery to run it on! I'll post some pictures on our Facebook page in the morning, although they will be mostly undecorated cars for now.
Labels:
Alaska Railroad (ARR),
Dining Car,
Projects,
SD70MAC
Wednesday, October 26, 2011
A Little Tour
Today being Wednesday, I would normally reserve this post for some stories from work. However, nothing particularly unusual has happened at work this week, so I thought I would use this post for something else.
Steven and I have both made references to various model railroad ideas and equipment that we own, and we have even posted pictures in the past. We have never really talked about any current projects though, which we thought might be interesting. Usually both oh us have about a dozen things going on at one time, and the work bench is often more cluttered than makes sense, but I suppose that is probably not unique to either of us!
Below is a video clip I took today, it is about sixteen minutes long, and it is just a tour of my work bench. I figured reading most of my posts takes as long as the video lasts. In the video you will see some of my current projects, a finished project, and a small part of my equipment. It is totally unscripted, just my thoughts as they occurred to me during filming. Anyway, enjoy the switch from the normal programming.
As usual, if you have any questions about what you see, feel free to leave a comment. You can also send us an email at ogden.bros.trains@gmail.com, or you can email me directly at james@ogdenbrotherstrains.com. Next week, we will go back to our regular scheduled programming, probably.
Steven and I have both made references to various model railroad ideas and equipment that we own, and we have even posted pictures in the past. We have never really talked about any current projects though, which we thought might be interesting. Usually both oh us have about a dozen things going on at one time, and the work bench is often more cluttered than makes sense, but I suppose that is probably not unique to either of us!
Below is a video clip I took today, it is about sixteen minutes long, and it is just a tour of my work bench. I figured reading most of my posts takes as long as the video lasts. In the video you will see some of my current projects, a finished project, and a small part of my equipment. It is totally unscripted, just my thoughts as they occurred to me during filming. Anyway, enjoy the switch from the normal programming.
As usual, if you have any questions about what you see, feel free to leave a comment. You can also send us an email at ogden.bros.trains@gmail.com, or you can email me directly at james@ogdenbrotherstrains.com. Next week, we will go back to our regular scheduled programming, probably.
Monday, August 8, 2011
Repainting Walthers Coal Cars, Part 1
I am repainting them. Because of that, it didn't matter what roadname or numbers I ordered, so I got the cheapest ones, which happened to be Walthers Trinity RD-4 coal hoppers. Model Train Stuff was having a sale, and I got four 6-packs for half price, I honestly don't remember which ones, I just got the cheapest ones they had. I am repainting them as Greenbriar Management Services, reporting mark BNBX. Let's just call them BNBX for short. BNBX is a car leaser, they have coal hoppers and coal gondolas running all over the place. They often lease cars to power companies that burn coal, which is what I am trying to model. While the power plant in Bow, NH does not lease any coal cars in real life, I thought it would be cool to have some of these modern coal cars running on my layout, and it would give me some more experience doing a simple repaint job. To start, here is a photo of a BNBX coal hopper:
Photo from www.rrpicturearchives.net.
The paint job should be easy, simply need to spray the cars with aluminum spray paint. After painting the cars, I will need to decal them. I found virtually all the decals I need for this project from two sources: Highball Graphics and Microscale. Here is a list of the decals I will be using:
Microscale TF-18: This will be used for the red ends of the car. It seems easier to cut the shapes out of the decal sheet rather than masking and painting those areas.
Microscale 87-260: This has most of the data I will need for the coal cars. As far as I can tell, nobody makes data sets for these coal cars, so some of the data that is unique to the cars will not be on the models, but this set will cover most of it.
Highball Graphics AD-14: This will do the yellow reflective striping found on most modern freight cars.
Finally, for the reporting marks, numbers, and Plate F signs, Jim at Highball Graphics is doing up a custom sheet for me. If I only had a few cars, I could order an alphabet set for the reporting marks and numbers, but because I have 24 cars, that is a lot of alphabet sets with a lot of extra letters and numbers! Jim has agreed to make a custom sheet with the reporting marks and numbers that I need, sized appropriately. If you need custom decals, I would recommend going to Highball Graphics.
Last but not least, Sergent Engineering has Type F couplers that I want to install on these cars. Most modern coal hoppers and gondolas use Type F couplers. However, last time I checked, the Type F couplers were out of stock, so for now the cars will keep the couplers they come with. I also want to order a working FRED for one car. I'll have to do a little more research on that first.
I am looking forward to painting up these cars. It will be a fun project and will get some modern coal cars on my layout, which is something I've been wanting to do for a while. My standards for a model unit train is the 20-25 car range, so the 24 cars I ordered will be a full train for me.
Monday, July 25, 2011
Another Little Update
I thought I would talk a little about the progress on my railroad again today. While construction of the actual layout has not advance any, other things have made progress. I ordered a grain elevator some time ago, and that has made a lot of progress, in that it was built. There are still a few things to be done with it, but the majority of the work on that is complete. Additionally, I have established a work area. That is a nice change. It is not anything fancy, but it works well and makes a huge difference.
First of all, the grain elevator. That went from plastic pieces in the box to assembled parts of the building in an afternoon. Figuring out how it all went together was not difficult. I kept it in larger pieces so it could be weathered as easily as possible later. Steven was out here for a couple of weeks recently, and he actually undertook weathering the thing. It still needs its clear flat coat to hold everything in place and take off any leftover shine. That will happen this afternoon, as I have the day off. Once that has been done, it will get the windows installed and then the final parts will all be assembled. I should be able to have it done by this evening.
The other night, I was frustrated because I had pieces of model railroad equipment scattered all over the dining room table and my desk, and I had no flat surfaces to take care of anything else. I headed off to work, and while I was on the train that night, I had a bit of inspiration. The last occupants of this apartment left behind two four foot by eight foot pieces of particle board. We have several large, sturdy boxes. It dawned on me that I could use the boxes and a board to set up a temporary work area. And at four by eight feet, it would certainly be a large work area! I set that up a few days ago, and finally got all my model train stuff off my desk and the dining room table. I figured while I am not actually building the model layout yet, I can still utilize the space in the room for other projects. I found an extra chair, and dragged that to the room, and just like that, I have a workbench. That was a huge improvement, yet such a simple one. Once it was all set up, which took only about an hour, I could not believe it had taken me so long to think of it!
Just to help you keep up, below is a photo of the railroad room with the workbench in place, and already occupied with tools, models, and projects. It still needs some organizing. As I moved stuff off the floor, dining room table, and desk, it just went wherever there was space on there. Right now it is a little cluttered and highly unorganized, although that should change as I use it over the next week or so.
First of all, the grain elevator. That went from plastic pieces in the box to assembled parts of the building in an afternoon. Figuring out how it all went together was not difficult. I kept it in larger pieces so it could be weathered as easily as possible later. Steven was out here for a couple of weeks recently, and he actually undertook weathering the thing. It still needs its clear flat coat to hold everything in place and take off any leftover shine. That will happen this afternoon, as I have the day off. Once that has been done, it will get the windows installed and then the final parts will all be assembled. I should be able to have it done by this evening.
The other night, I was frustrated because I had pieces of model railroad equipment scattered all over the dining room table and my desk, and I had no flat surfaces to take care of anything else. I headed off to work, and while I was on the train that night, I had a bit of inspiration. The last occupants of this apartment left behind two four foot by eight foot pieces of particle board. We have several large, sturdy boxes. It dawned on me that I could use the boxes and a board to set up a temporary work area. And at four by eight feet, it would certainly be a large work area! I set that up a few days ago, and finally got all my model train stuff off my desk and the dining room table. I figured while I am not actually building the model layout yet, I can still utilize the space in the room for other projects. I found an extra chair, and dragged that to the room, and just like that, I have a workbench. That was a huge improvement, yet such a simple one. Once it was all set up, which took only about an hour, I could not believe it had taken me so long to think of it!
Just to help you keep up, below is a photo of the railroad room with the workbench in place, and already occupied with tools, models, and projects. It still needs some organizing. As I moved stuff off the floor, dining room table, and desk, it just went wherever there was space on there. Right now it is a little cluttered and highly unorganized, although that should change as I use it over the next week or so.
Monday, May 30, 2011
Making an NMRA Weight Ruler
National Model Railroad Association, or NMRA, sets standards for model railroading. This makes models from different manufacturers compatible with each other, and it ensures better operation. One of the standards, practice 20.1, addresses the topic of weight. Without a standard for weight, a long freight train with cars from different manufacturers could potentially derail due to different things. Having lighter cars in the middle of the train, for example, could cause the train to tip over on a curve. However, NMRA set a standard for weight so this becomes less of an issue.NMRA 20.1 is actually pretty simple. The numbers are different for the different scales, but it works the same. I will use the HO scale numbers, because that's what I model. For HO scale, the standard is 1 ounce starting out, plus half an ounce for each inch of length. It's a simple formula, however if you have a whole fleet of freight cars to standardize, it can get tedious doing the math for every car. That's where the ruler comes in. Because the standard is based on car length, I made a ruler that instead of measuring inches, measures NMRA weight standard. You simply hold the ruler up to the car, and the closest number to the end of the car is how much NMRA says it should weigh. Let me explain how I made this ruler.
I started out with a piece of sheet styrene. Thickness really doesn't matter for this, so I used a thin .010" sheet. I cut it into the shape and size of a ruler. I just used a ruler I had as a template, and cut around it. My NMRA ruler is 12 inches long, which is fine because only articulated cars are longer than that, and for those you can weigh each section separately. Next, I spray painted the styrene a hideous light green color. Any light color will be fine. I just don't want to see a styrene strip on my workbench and think I can cut it up for a project, just to find out it was my NMRA ruler! After letting it dry, I set my regular ruler next to it and marked every quarter inch on the styrene with a ballpoint pen. You can go closer together or further apart if you want. Further apart means less accurate measurements. I think every quarter inch is close enough, because at that point you're talking about a difference of 1/8 of an ounce, which in't much. Then, starting at one end, I started with the number 1 and went up every quarter inch, so 1.000, 1.125, 1.250, 1.375, etc. until I had reached the end of the ruler. Then I wrote that it is a NMRA weight ruler, and sprayed the whole thing with dullcoat to seal it all together. Now, thanks to a simple project, I don't have to do any math when checking my freight cars for NMRA weight standards!
My NMRA weight ruler. I marked every quarter inch with the NMRA weight standard for that measurement. I thought of decaling the numbers to make it legible, but decided that was too much work and wrote them by hand instead.
By putting the end of the ruler at the end of the car not in the photo, I can see right away that the car has to weigh 4.75 ounces to be up to NMRA standards. No more math for weighing freight cars! By the way, does the car look familiar?
Monday, May 16, 2011
Project Update: More Layout Progress
Alright, time for another update on how the layout is coming. Honestly, I have not had a lot of time lately to work on it because I have been working on the real railroad. In the past week, we have had flash flood warnings, high wind warnings, a derailment, the BNSF business train, a washout, and all the other typical railroading things. I'll talk more about those in my Prototype Railroading posts. Let's talk about model railroading though. Unfortunately, I still have not started on construction. Planning continues, and I have made a few small changes to the overall plan.
Lately, I have been working on making templates for the various buildings I would like to use. I have looked through the Walthers Reference Book for ideas, and I have talked to Steven a lot, as he has built a couple model railroads. Because of the size of my railroad, it is just going to be an industrial railroad. The primary activity will be to switch cars at various industries on the line. The line will connect to a staging/storage yard, which is where the cars will come from. There is also a junction with a two track main line, which would also connect to the rest of the world. Before I continue explaining what I am thinking, let me share a picture.
There are probably a few changes you have noticed from the last update. First off, I found I could make the side with the main line on it a bit narrower. The main line was going to be towards the back of the railroad anyway, so I figured I could move it closer to the front by simply eliminating some of the extra space in front of the main tracks. The black shapes are new, and represent buildings. Close to the bottom of the photo is where the passenger station will go. Up in the top left there will be a grain elevator. I found two that I liked, and I wanted to see which one would fit better, which is why there are two templates up there. Eventually, only one will actually go in there. To the right of the grain elevator will be an oil loading facility for tank cars. Further to the right there will be an open air transloading facility for a lumber yard. Above that transloading facility I am considering putting a scrap yard, but I have not yet worked out how much space it will take and where exactly the track to it will go.
I want to get a few things planned out a little better, and then start building. Before I start construction, I need to get some tools though. I have hand tools, but for building the bench work, I would like to have some power tools. So I am still a few steps away from beginning construction, but this is where I am at now. I am excited to keep going with this project and finally be able to have a model railroad!
Lately, I have been working on making templates for the various buildings I would like to use. I have looked through the Walthers Reference Book for ideas, and I have talked to Steven a lot, as he has built a couple model railroads. Because of the size of my railroad, it is just going to be an industrial railroad. The primary activity will be to switch cars at various industries on the line. The line will connect to a staging/storage yard, which is where the cars will come from. There is also a junction with a two track main line, which would also connect to the rest of the world. Before I continue explaining what I am thinking, let me share a picture.
There are probably a few changes you have noticed from the last update. First off, I found I could make the side with the main line on it a bit narrower. The main line was going to be towards the back of the railroad anyway, so I figured I could move it closer to the front by simply eliminating some of the extra space in front of the main tracks. The black shapes are new, and represent buildings. Close to the bottom of the photo is where the passenger station will go. Up in the top left there will be a grain elevator. I found two that I liked, and I wanted to see which one would fit better, which is why there are two templates up there. Eventually, only one will actually go in there. To the right of the grain elevator will be an oil loading facility for tank cars. Further to the right there will be an open air transloading facility for a lumber yard. Above that transloading facility I am considering putting a scrap yard, but I have not yet worked out how much space it will take and where exactly the track to it will go.
I want to get a few things planned out a little better, and then start building. Before I start construction, I need to get some tools though. I have hand tools, but for building the bench work, I would like to have some power tools. So I am still a few steps away from beginning construction, but this is where I am at now. I am excited to keep going with this project and finally be able to have a model railroad!
Monday, April 18, 2011
Project Update: Layout Progress
A few weeks ago, I mentioned that I had been kindly given a railroad room, and that I planned to take advantage of that and build a small model railroad. I have made some progress on that project. Now, no construction has actually begun yet, for several reasons. First, the railroad executives (me) must secure funding for construction. Second, I want some fairly complete plans for the railroad. I know that if I begin building before I have it almost entirely planned out, I will become distracted, and a portion of the model railroad will always remain incomplete. Now I realize that model railroads, in a sense, are never really finished, but I would like to get it to a finished state, where it does not look like it is still under construction. I am sure I will make changes from time to time, I expect that, but it would be nice to have a more or less complete railroad to run.
Since I first announced this project, about two weeks ago, I have done quite a bit of planning. I did some searching for track templates I could print out and play around with, and I did a little measuring in the room. After that, as the unpacking from moving in continued, I came across an old Walthers Reference Book. It is a couple of years old, but I have found that the products that Walthers carries does not change that drastically from one year to the next, so I began browsing through the reference book. Since I primarily want an industrial line, I began looking through the various industries that Walthers carries, or carried a couple years ago when this edition of the reference book was published. I marked pages that had industries that looked practical for the space I have.
As I looked through all the industries, I began to picture how all of this would fit together, but I had a hard time getting a good grasp on just how much space was available, so I set the reference book down and picked up a tape measure. I took some architecture classes in college, but rather than try to draw scale plans of a scaled down railroad, I decided to take a different approach. The plans are 12"=1' scale. I found a roll of masking tape and a tape measure, and I went to work. I had already decided on the size and shape I wanted for the railroad. It is going to be an L shape, along two walls of the room. I decided to make it three feet wide from each wall. Using those basic measurements, I measured the space and began making lines on the floor with the masking tape. It is a carpeted floor, so making adjustments is easy with tape, yet the masking tape sticks well enough to the carpet that I do not have to worry about it moving when I walk around, or if I step on it by accident.
Once I had laid out the basic area the railroad would occupy, I had a much better idea of how it would fit in the room, and how it would feel in the room. I made a few minor changes, such as trimming the corner by the door, to make it feel more open, and then took a second look at it. I considered a few other options with it, and placed tape accordingly. Some I liked, others I did not. Fortunately, the tape was not permanent, and removing it was simple if I did not like something! Once the layout was drawn out with masking tape, I started thinking about how the track should fit in the layout.
As I thought about the track, I decided it would be helpful to print out a small pile of templates for different sizes and types of switches. I figured it would be easy enough to represent simple straight and curved sections of track, but getting switch angles right would be significantly easier with some templates. I printed out a selection of sizes, even some I was sure I would not use. Then I cut them out and started placing them in different areas to get ideas. I knew on one leg I would want a main track, or perhaps two main tracks, so I could simulate a connection to the rest of the world. It would give the trains that serve the industries a place to go. Now, a main line of just nine feet really is not much at all, but it serves as a connection to more, which will not be represented by this model railroad. It does serve as a point to begin expansion, if the railroad ever moves to a bigger space.
After staring at the space available to me for a few days, and moving switch templates to different spots to help me visualize, I decided to start laying tracks with masking tape. Once again, I applied the tape directly to the carpet to represent tracks. I placed them the proper distance apart, and put sticky notes describing switches on the walls near the switch locations. I used the templates to figure out the switch angles, and the last photo above is what I have come up with so far. I have two main tracks, and the industrial spur. One industry siding is marked out. That industry will be a lumber yard. Loads of lumber will be delivered there. I will also be putting a grain elevator on the main track, as well as several other industries down the single track industrial spur. Also down the industrial spur will be a connection to a small staging and storage yard, as well as my work bench.
That is the progress I have made so far. I will post a schematic of this. First I have to make one though. The dashed lines in the photos above represent the edge of the future railroad, and the solid lines represent tracks.
| Progress about a week ago |
| Layout progress last week. |
| Layout progress this afternoon |
As I thought about the track, I decided it would be helpful to print out a small pile of templates for different sizes and types of switches. I figured it would be easy enough to represent simple straight and curved sections of track, but getting switch angles right would be significantly easier with some templates. I printed out a selection of sizes, even some I was sure I would not use. Then I cut them out and started placing them in different areas to get ideas. I knew on one leg I would want a main track, or perhaps two main tracks, so I could simulate a connection to the rest of the world. It would give the trains that serve the industries a place to go. Now, a main line of just nine feet really is not much at all, but it serves as a connection to more, which will not be represented by this model railroad. It does serve as a point to begin expansion, if the railroad ever moves to a bigger space.
After staring at the space available to me for a few days, and moving switch templates to different spots to help me visualize, I decided to start laying tracks with masking tape. Once again, I applied the tape directly to the carpet to represent tracks. I placed them the proper distance apart, and put sticky notes describing switches on the walls near the switch locations. I used the templates to figure out the switch angles, and the last photo above is what I have come up with so far. I have two main tracks, and the industrial spur. One industry siding is marked out. That industry will be a lumber yard. Loads of lumber will be delivered there. I will also be putting a grain elevator on the main track, as well as several other industries down the single track industrial spur. Also down the industrial spur will be a connection to a small staging and storage yard, as well as my work bench.
That is the progress I have made so far. I will post a schematic of this. First I have to make one though. The dashed lines in the photos above represent the edge of the future railroad, and the solid lines represent tracks.
Monday, February 7, 2011
Another Project Begins
I have been thinking about building a model of the Union Pacific Depot, in Salt Lake City, UT, for some time now. It is an old brick and stone station building, which is now part of a nice outdoor mall called The Gateway. The station was used as such until the late 1990's, by Amtrak. During that time, the city officials wanted to consolidate the various railroad lines in town and develop some of the neighborhoods they occupied. At one time, Salt Lake City was home to the Union Pacific, Southern Pacific, Western Pacific, and Denver & Rio Grand Western, among other short lines. Since these railroads were competing with each other, they all had their own yard and station facilities, as well as their own rights of way. Downtown Salt Lake City was covered in railroad tracks. By the late 1990's, all those different railroad lines were owned by the Union Pacific, which meant consolidation was a realistic possibility. As the rail lines were consolidated, the right of way was moved several blocks away from the Union Pacific Depot, and an "Amshack" was built to accommodate the Amtrak trains that serve the city.
Originally the station was built by the Oregon Short Line and the San Pedro, Los Angeles, and Salt Lake Railroad. It was completed in 1909. Both railroad lines eventually were acquired by the Union Pacific Railroad, and with that, they also received the station in Salt Lake City. The building itself is a large, French Renaissance style building. It is constructed of brick and stone, with a copper roof. The copper roof was installed in 1978 to replace a badly leaking slate roof. On the top of the building, above the front entrances, there is a large, neon, Union Pacific sign, complete with the shield logo of the railroad. The track were once located behind the building. Today, though not used as a station anymore, the neon sign is lit every night, and the building remains a landmark in Salt Lake City.
My plan is to model this building in HO scale. I will model it with the tracks out back, as it would have been found when in use as a station. I am also going to model the copper roof, even though that was not added until 1978. I do plan to model a basic interior. I would like to have an accurate representation of the main concourse. The whole station will be lighted, and there will be people inside. Of course, it will get the landmark neon Union Pacific sign on the roof too. Actually, the whole project came about because of that sign. I had been wanting to model this for some time now, but I found a model of that very sign at a train show recently, and I bought it. I guess that was the first piece of the project.
| Union Pacific Station, seen from the EnergySoluntions Arena. Photo by James Ogden |
| The front entrance of the station. Photo by James Ogden |
Monday, January 31, 2011
HO Factory Project: Introduction
Today I am going to talk about a modeling project that I recently picked up again. It started out as a mill building for the Lakes Region railroad, and when that layout went into storage the unfinished mill building went on the back burner for a while.I was recently digging around my structure kits and whatnot when I found this half completed mill. With no near-future prospects of the Lakes Region layout seeing action any time soon, I decided to change the building's purpose a bit. I thought, why not model an old mill building that has a new tenant that needed the building expanded? I would finish the model as I designed it, but kitbash it so it has a corrugated steel addition built onto the side. Since I have no place on a layout for this model, I will build it as the main focus of a diorama.
The original building will be built the same, except I am going to add a story to it. This is partly because I have already started detailing the brick, and I want to go through that process step by step with photos on the blog, and also because a bigger building just looks cooler. The addition will be built off of one end of the building, and will feature loading docks and a big door where rail cars can go into the building, as well as a front office and possibly a small store area. I'm thinking of modeling it as a furniture factory right now, although that is still up in the air. If I go with that plan, the building will also need a large, paved over area for unloading lumber off of centerbeam cars. I have the space on the diorama for that, and I'm not sure what else to do with the space. I'm also toying with the idea of the factory going through a "going green" initiative, and have solar panels on the roof. I don't know of any HO scale solar panels out there, but it would be fun and easy to scratchbuild those. A small woodchip-fired power plant built onto the side of the factory would be cool too, and realistic in a furniture factory that has plenty of woodchips to fire it with.
The original building will be built out of Walthers Modulars kits. These things are great. They are molded as brick walls, and several different door and window styles are available. They fit together very easily, and you can easily build a structure as big or small as you want and whatever design you choose. They come molded in appropriate colors, but are easy enough to paint over if you are following a specific prototype. For the addition, I am searching for Walthers recently discontinued "Peterson Tool Specialties" kit, a model of a corrugated steel warehouse. It is no longer available from Walthers, but it was discontinued quite recently so it is still available elsewhere. Walthers has other corrugated steel warehouses, but I want this one because it has the rail car door and the front office. While I could kitbash those onto a different building if I have to, it's easier if I use a kit that already has those features out of the box.
Speaking of kitbashing, I won't be building the Peterson Tool Specialties the way the instructions want me to. If it's like other Walthers kits, I can probably arrange the office, loading docks, and doors however I want, which will be nice for fitting it to the other building, but it won't be a stand alone building. It will be attached to the original brick structure, so I will need to combine the walls and roof (it will be lower than the brick building) smoothly to make it look like it really is an addition. I know this kit is designed to be able to combine with other kits for a bigger building, but I'm sure it's not meant to combine with a brick warehouse out of the box. Also, I won't be using the roofs that come with either building. I will be using sheet styrene and digital photos to create a realistic tar paper roof, a staple of modern industrial buildings.
As a full time student, I won't be making major progress every week, so I won't be posting new stuff for this project every week. My next post will be about prototype information, which is always a useful in making a building look realistic. I will go around the next few weeks and take photos of old mill buildings and new corrugated steel buildings so I have stuff to work from and some photos to share here.
Subscribe to:
Posts (Atom)