
 Today I am going to talk about brick structures. There are several different ways to model them, the most common being structure kits molded in plastic with a brick pattern molded right into the plastic. You can also get paper brick sheets, which glue to the material you're using to build the structure, and have a brick pattern printed on them. These are fully finished for you, but offer less detail because the brick pattern is two-dimensional. I am going to focus on detailing plastic brick patterns.
 There are three ways to model a brick building in plastic. You can get a kit that has all the pieces you need. Some companies, like Walthers and DPM, offer modular brick systems, where you can buy different components and use them to construct a custom-designed building. You can also scratchbuild a structure with plastic brick-pattern sheets available from several manufacturers. You can combine these methods, but make sure that if you use different materials, the brick patterns match each other unless you are going for a mismatched look, often found in buildings that have been expanded over time. Walthers brick sheets match the pattern and colors found in their modulars and most of their kits, so you can scratchbuild an annex or another portion of the building using their brick sheets.
One problem with plastic brick is the obvious lack of mortar. Some brick buildings are painted over, so the brick and mortar are all the same color. These are easy to model, but most brick buildings do not get painted over. I have tried several mortar techniques, and I will share two of them today. Both techniques require you to paint the bricks first, if they are not already the color you want. This can be done by airbrushing or using a spray can. Brick colors vary, so color matching isn't much of an issue.
The first technique I tried was using acrylic paints. I used a white paint and thinned it down, and then spread it over a portion of the brick pattern. Most of it soaked into the low areas, where the mortar goes. Then, with a damp paper towel, quickly wipe down the area you just painted. Thinned acrylic paint dries quickly, so you have to work in small sections so you can wipe it down quickly. This can leave white streaks on the brick faces, which some buildings have, so it is not completely unrealistic. This method is easy and provides a very even finish for the mortar. I do not have any photos of buildings I have mortared with this technique.
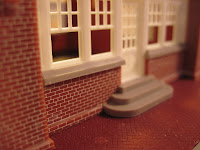
The second method, which I found in an old Walthers catalog, is also quite a bit harder and more tedious, but I tend to use it more. This involves using spackle, a wallboard putty, as the mortar. Using your finger, get a small lump of spackle and spread it over the brick pattern. It will fill in the mortar crevices and leave a nice finish. However, it will also lump into other areas, such as under window sills and in doorways, where you do not want it. After it has dried, use a dull hobby knife to remove these unwanted lumps. Using this technique makes it harder to get an even fill in the mortar, and requires much more patience, but I think the results are worth it.

Once the mortar is in place, it is time to focus our attention on the bricks themselves. If you're really ambitious, you can use a hobby knife to chip away at some bricks to give them an aged look. I'm not that ambitious, so I leave the shapes alone. However, I do take colored pencils, usually a bright red, a grey, and a white, and individually recolor some of the bricks. How many and what colors are up to you, as every building is different. Some newer buildings don't have any miscolored bricks, thanks to advances in the kiln technology which allows all the bricks to get fired evenly, regardless of where they are in the kiln. If you didn't repaint your bricks, it is a good idea to spray them with dullcoat before doing this step. Colored pencils do not write on bare plastic, but they do work well on paint.

To weather the bricks, use whatever techniques you usually use for weathering structures. I try to keep most of the dirt near the ground. If the building has a chimney, put some soot near the top of the chimney. Window sills often have streaks running down from them, caused by rain. On bigger buildings, big bolts were often used to hold the wooden beams inside the building to the exterior brick walls. These bolts often have star-shaped decorative washers. You can get plastic models of these. Streak the paint coming off of those with a burnt umber or black oil paint, using the same technique I've shared for rusting in a previous post. Notice the star washer with the streaked paint in the photo of brick mill in Nashua.
Well, there you have it. With just a little work (okay, the colored pencil step takes a while), you have a well detailed brick building. No more solid red brick walls on your layout now!


